Lotos
Simple & Elegant Blog Theme
- created: 09/07/2016
- latest update: 23/10/2019
- by: Excellent Dynamics
- themeforest.net/user/excellent_dynamics
- email: support@excellentdynamics.biz
Thank you for your purchase! If you have any questions that you feel should have been in this document, please log in using the account used to purchase the file and email via my user page contact form here. Thanks so much!
Documentation
Lotos WordPress Theme
Overview
Lotos is a versatile and powerful multipurpose WordPress blog theme perfect for any personal blog. Lotos makes customizing your blog and changing colors, fonts, and most elements a breeze. Lotos offers a stunning visual experience to showcase your content with responsive grid system layout optimized for mobile touch and swipe. Perfect for fashion blogs, lifestyle blogs, travel blogs, food blogs, craft, tech, creative, photography., etc.
Theme Features
- Responsive Design
- Flexible Slider (GRID and Full-Width)
- Google Fonts selector for most elements (8 pre-build )
- Choose between full-width or standard post layout on a post-by-post basis
- Color customizer for most elements
- 3 Promo boxes below slider
- 4 Level Mobile Menu
- Modern UI Post Type
- Single Posts (left sidebar, no sidebar, right sidebar, centered)
- Page Template (left sidebar, no sidebar, right sidebar, centered)
- Page Template w/ Slider and/or Promo Boxes
- Post Formats
- Standard Post
- Image Post
- Gallery Post(Slider Posts)
- Wordpress Gallery Post(Standard)
- Music Posts(soundcloud)
- Video Post(youtube/vimeo)
- Quote Post
- Link Post
- Full-WIdth Posts
- Tons of customizable color options (Links, Color Scheme – Dark, Light, Background – color and image
- Social media icons in Footer and Sidebar
- Translation Ready(4 language pre-build)
- Works with WP 4.4+
- Custom Widgets (About Me Widget, Social Icons Widget, Latest Posts Widget)
- Instagram Widget styling included
- Contact Form 7 Support
- Theme Options powered by WordPress’ Customizer
- Sticky navigation
Installing the Theme
So you've purchased Lotos & you're ready to get started – great! When you purchase an Lotos license from ThemeForest & download the theme package, you will receive a zipped folder titled "Lotos-A-Blog-Theme".
Unzip this first folder.
Within the unzipped theme package, you will find a number of folders such as demo content, documentation, logo image files, etc. There is also 1 additional zipped folder within, titled "lotos.zip".
Important: DO NOT unzip this "lotos.zip" folder! This particular .zip folder should remain zipped.
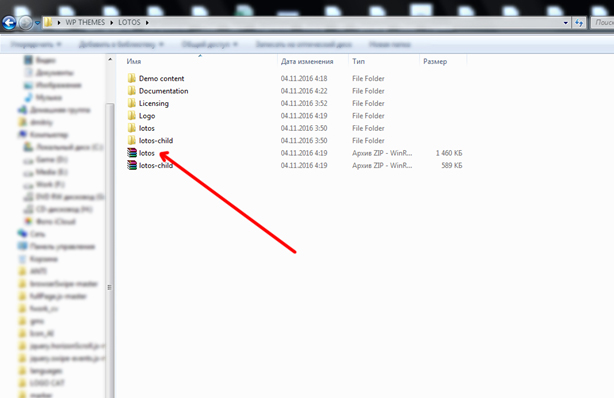
"lotos.zip" is the main theme.
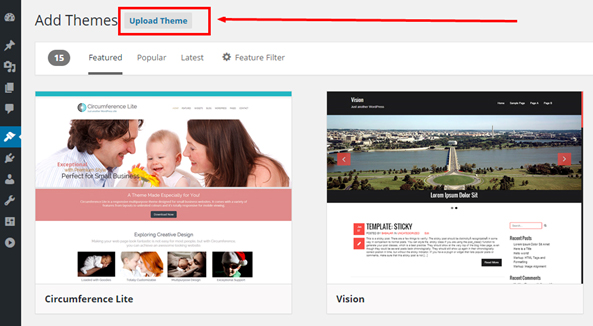
Within your WordPress Dashboard, navigate to Appearance > Themes. Click the "Add New" button at the top-left of the page > Click the "Upload Theme" button at the top. Click "Choose File" > find your zipped "lotos.zip" file > Click the "Install Now" button.
Once the theme is successfully installed on your WordPress, you can "Activate" it via the installation page or via Appearance > Themes to switch over and begin using your Lotos theme!
Please note: If you try installing the entire zipped theme package or another incorrect file, you'll likely receive this error message:
"The package could not be installed. The theme is missing the style.css stylesheet. Theme install failed."
If you receive this error message, please be sure that you're installing the ZIPPED file titled "lotos.zip".
Creating a Post
Lotos has the possibility to create 7 different types of posts: standard, image, video, audio, gallery, quote and link. In order to activate these post options, you'll first want to ensure you've installed & activated the required Post Formats UI for Lotos. This plugin comes included with the theme. When you first activate Lotos, you should notice a banner notification across the top of your dashboard advising you to install specific required & recommended plugins.
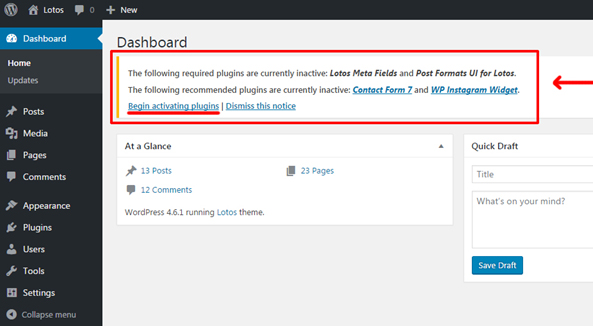
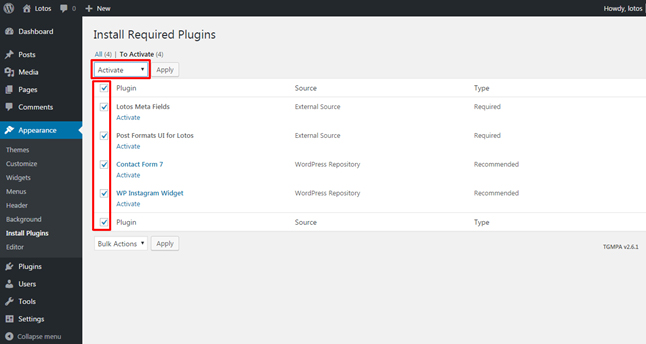
Install & activate the Post Formats UI for Lotos, Lotos Meta Fields plugin by clicking the "Begin installing plugins" link. Check the boxes next to the plugins > select "Install" from the drop-down menu > and click "Apply". After, follow the same steps yet select "Activate" from the drop-down menu (plugins need to be both installed AND activated to function).
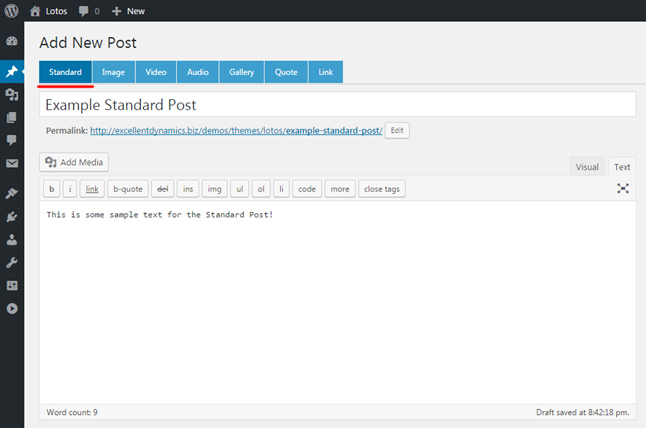
To create a new post, go to WordPress Dashboard > Posts > Add New. Above your content box & toolbar, you'll see a series of tabs titled Standard, Image, Video, Audio, Gallery, Quote and Link. Select whichever tab you'd like your post format to be in. Each tab will give you different input boxes depending on the content you'd like to add.
Standard Post
A standard post is the default post type. You can add text and images to your post using the tools and content box. Example of a standard post: http://excellentdynamics.biz/demos/themes/lotos/blog/mountains/
Additionally, you have the option of choosing between a number of post templates/layouts via the drop-down menu on the right titled "Template":
- Default post layout (Right Sidebar)
- Full-width post layout. (Post Full Width)
- Left sidebar post layout. (Post With Left Sidebar)
- Both sidebar post layout. (Post No Sidebar)
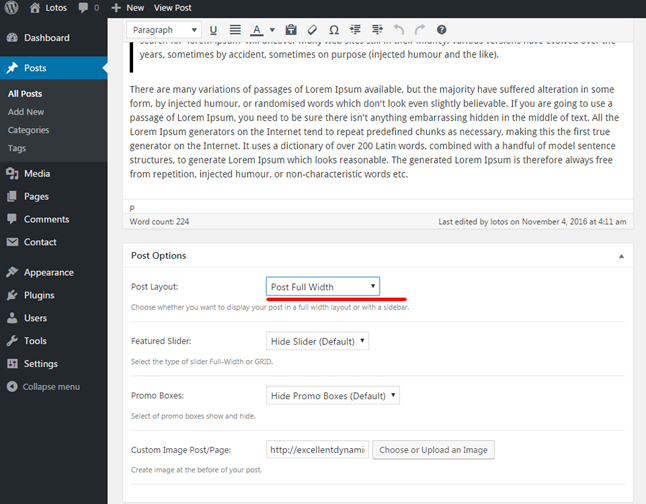
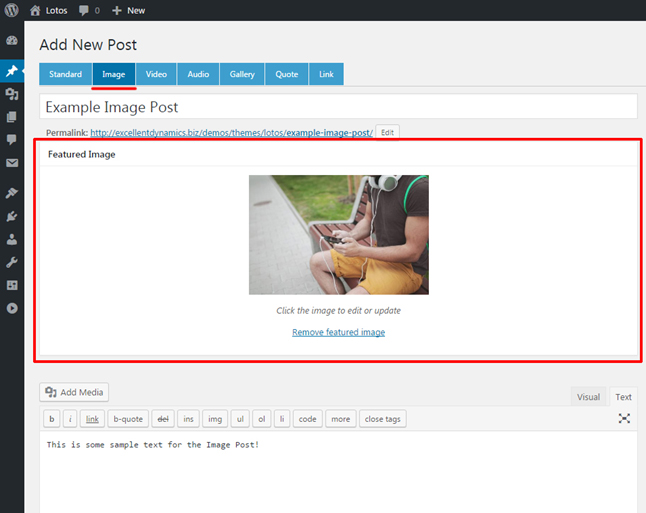
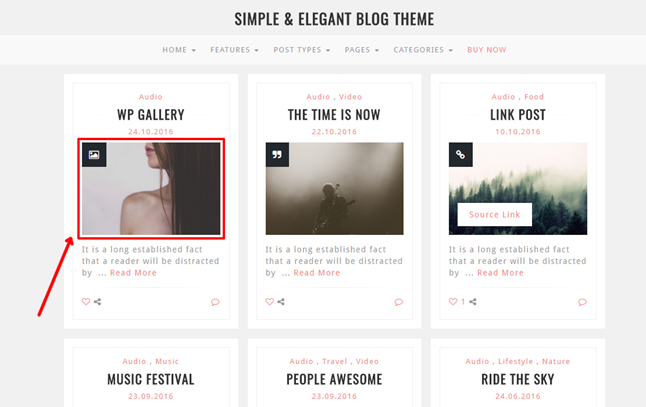
Image Post
A image post allows you to create a image at the top of your post. After clicking the "Image" tab to choose this post format option, click the "Set featured image" link within the "Featured Image" box that has appeared. Select whatever image you'd like from your WordPress Media Library. Example of a image post: http://excellentdynamics.biz/demos/themes/lotos/blog/beautiful-girl/
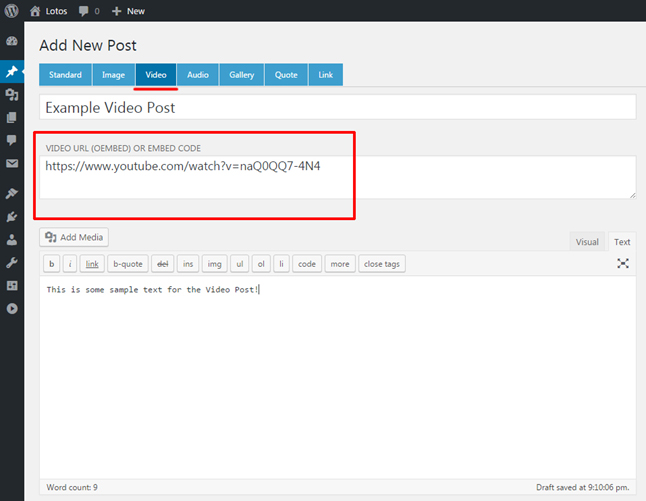
Video Post
A video post displays a video at the top of your post. You can share videos from nearly all video hosting sites, such as Vimeo or Youtube. Simply copy & paste the video's URL, oembed code, or embed code into the special input box. When you preview or publish your post, the video will appear. Example of a video post: http://excellentdynamics.biz/demos/themes/lotos/blog/people-awesome/
Audio Post
An audio post allows you to share a music or audio track and displays it at the top of the post. Like the video post, simply copy & paste the track's URL, oembed code, or embed code into the special audio input box. When you preview or publish the post, the track will appear. Example of an audio post: http://excellentdynamics.biz/demos/themes/lotos/blog/hippie-sabotage/

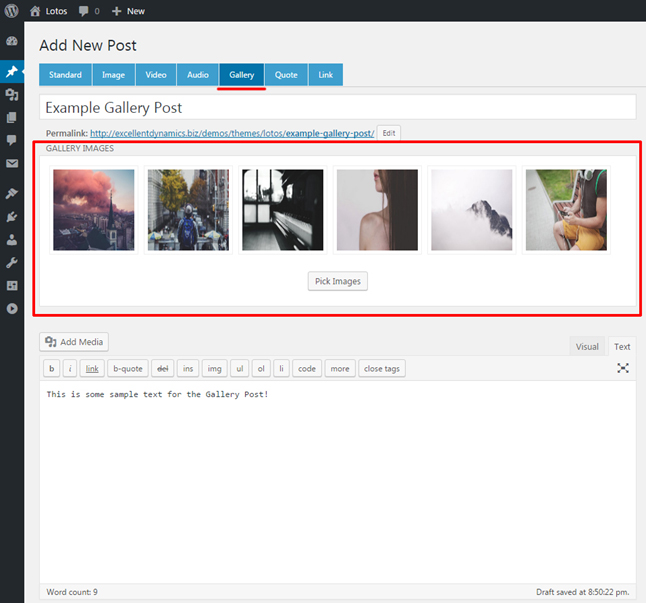
Gallery Post
A gallery post allows you to create a slideshow-type gallery at the top of your post. After clicking the "Gallery" tab to choose this post format option, click the "Pick Images" button within the "Gallery Images" box that has appeared. Select whatever images you'd like from your WordPress Media Library. Example of a gallery post: http://excellentdynamics.biz/demos/themes/lotos/blog/barbecue/
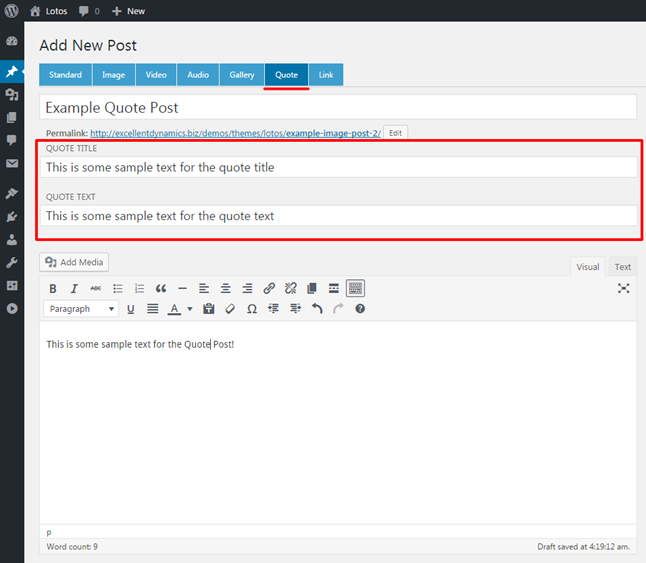
Quote Post
An quote post allows you to enter a quote text and displays it at the bottom of the "Featured Image" of the post. Like the quote post, simply paste the quote title and quote text into the special input box. When you preview or publish the post, the quote text will appear. Example of an quote post: http://excellentdynamics.biz/demos/themes/lotos/blog/fashion-women/
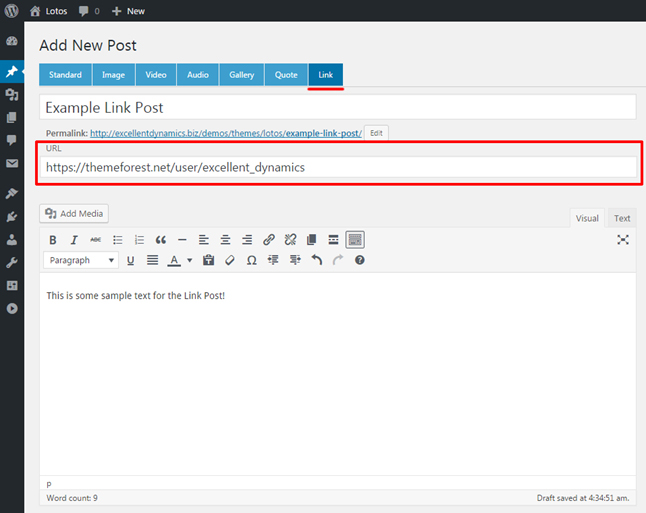
Link Post
A link post displays a link at the bottom of your "Featured Image" in your post. Simply copy & paste the custom URL, into the special input box. When you preview or publish your post, the url (Source Link )will appear. Example of a video post: http://excellentdynamics.biz/demos/themes/lotos/blog/pilaf-pork/
Once you've determined your desired post format, entered your title, and added your content, remember to assign at least 1 category to your post. Additionally, also ensure you assign a featured image to the post.
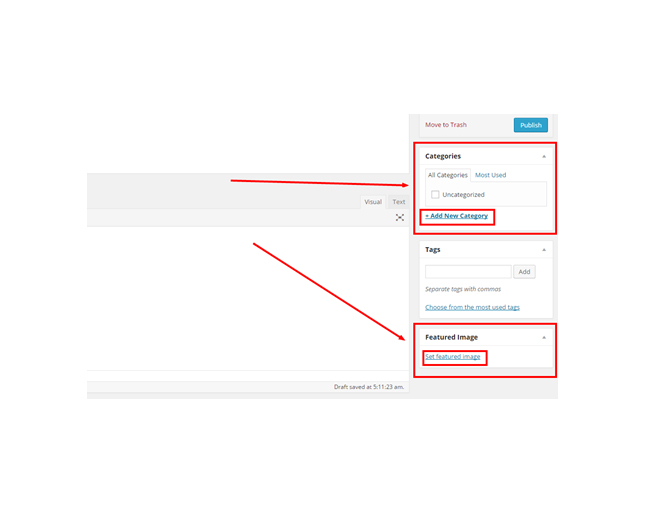
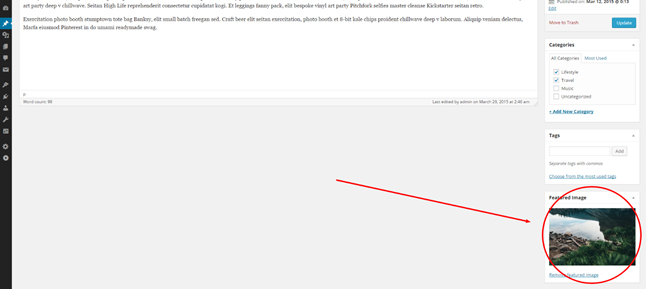
Featured Image
What is a Featured Image?
A Featured Image is a representative picture for your post which is used in a number of areas & functions, like on the homepage, post page, related post areas, recent post widgets, featured area sliders, etc…
How do I assign a Featured Image?
To assign a Featured Image to a post, navigate to your post's create/edit screen and look to the bottom-right. Here, you'll see a box titled "Featured Image" where you can add your desired image. Be sure to update your post when you're finished.
Once you're finished preparing your post, you can click "Preview" to preview how your post will look once published onto your site, click "Publish" to have it appear on your site, or click "Save Draft" to save your post as it is, though not publish it yet.
Creating a Page
A standard, static page is similar to creating a post in many ways, and is ideal for creating an About Me or Contact Me section to your website.
To create a new page, navigate to WP Dashboard > Pages > Add New. Like a post, you can enter a page title, add content, and assign a featured image.
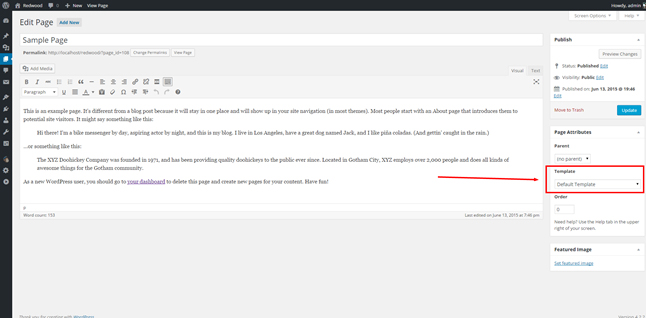
Additionally, you have the option of choosing between a number of page templates/layouts via the drop-down menu on the right titled "Template":
- Right sidebar page layout. (Default Template)
- Full-width page layout. (Page Full Width)
- Left sidebar page layout. (Page Left Sidebar)
- Both sidebar page layout. (Page No Sidebar)
*for each page you can select the slider or promo boxes separately or together
How do I create a Contact Me page?
First, please be sure that you have installed and activated the Contact Form 7 plugin.
Creating the form
- On your WordPress Dashboard, navigate to Contact > Add New
- If you would like your contact form to display in English simply click "Add New", otherwise, select your desired language
Along the top of the contact form's settings box, there are 4 tabs: Form, Mail, Messages, and Additional Settings.
"Form" tab: you can choose how your contact form will display with some simple HTML code.
"Mail" tab: you can set up who your messages are sent to and how they will be displayed.
IMPORTANT! Please be sure to navigate to the "Mail" tab and insert your own email address within the "To:" form.
"Messages" tab: Adjust default messages visitors will receive in various situations.
"Additional Settings" tab: Option to add custom code snippets if desired.
- Once finished setting up your form, click the "Save" button.
- A bit of code snippet will be generated at the top of the page, highlighted in blue. Copy this code snippet as we will then paste it into a WordPress page.
Creating the page
- Create a new "Contact Me" page (via WP Dashboard > Pages > Add New) and add it to your navigation menu if you have not already done so.
- Copy & paste the generated contact form short code into the text box on the create/edit page screen
- And, voila! Your new contact form will appear when the page is published.
*Note for the Lotos theme:
To have your contact form appear as it does on Lotos demo site, we have included some pre-styling within the theme. When you create your contact form, use the following mark-up:
<h4 class="lot_form_title">Contact Us</h4>
<p>[textarea* your-message class:form_area placeholder "Your message"]</p>
<p>[text* your-name class:form_area placeholder "Name *"]</p>
<p>[email* your-email  class:form_area placeholder "Email *"]</p>
<p>[text your-subject class:form_area placeholder "Subject"]</p>
<p>[submit class:submit "Send Message"]</p>
Once you've published your new page, it will not automatically appear in your main menu. For a tutorial on adding items to your main menu: view article " Creating a Main Menu ".
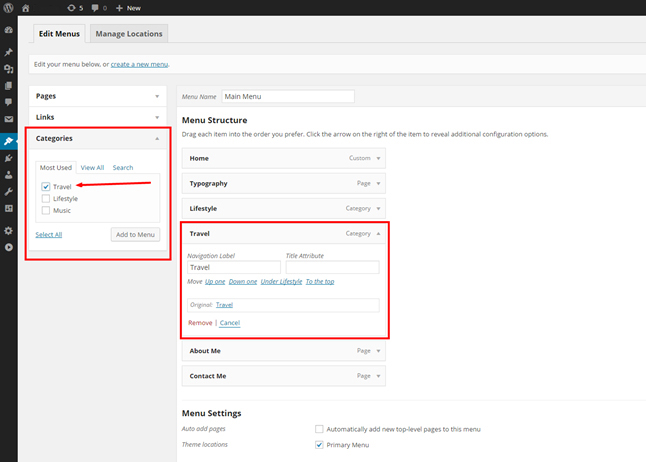
Creating a Category Page
A category page is a dynamic page that pulls in all of your posts assigned with a particular category. You do not create a category page like you would a standard page (described above)-- a category page is generated by WordPress after you add a category to your main menu.
First, ensure you've assigned the category to at least 1 post. Then, navigate to Appearance > Menus and click the drop-down box heading titled "Categories" on the left of the page. Below, your categories will be listed. Check the box next to your desired category and click "Add to Menu". Be sure to save. When you click on the newly-created menu item, it will take you to that category's page.
Home Page Settings
Your homepage is the first page visitors will see when they arrive at your website. By default, the homepage will be the page that also displays all of your posts, beginning with the most recent. We call this feature the "post feed".
To customize how your homepage looks, including its layout, colors, enabling/disabling the sidebar, etc., navigate to WordPress Dashboard > Appearance > Customize
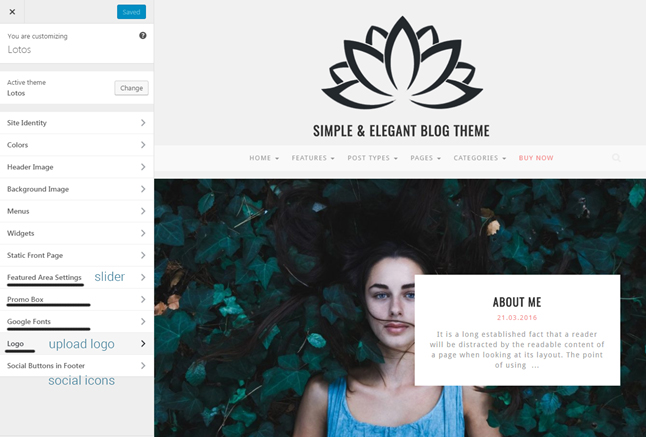
Be sure to explore the various options within this Customizer section. The live preview on the right will show you a preview of how each adjustment will visually affect your site.
If you'd like your homepage to instead be a static page and have your post feed display on another page entirely, please check out our tutorial here:
How to create a static homepage & separate blog page?
By default, your homepage will also display your post feed, listing all of your latest posts for visitors to see. If you would like to instead have your homepage be a static page and your post feed display on a separate page, you can follow these instructions.
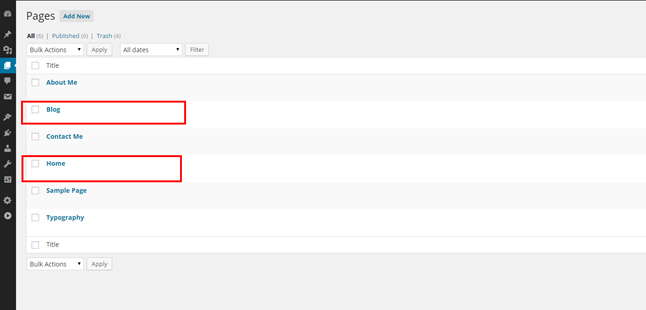
First, create your new homepage and blog pages within WP Dashboard > Pages > Add New.
For this tutorial, we will be naming our static homepage "Home" and our post feed page "Blog".
Next, navigate to Settings > Reading. At the top of this screen, you'll see a section titled "Front page displays". Click the little bubble next to the "A static page" option.
From this option's "Front page" drop-down menu, select your newly created "Home" page.
From the "Post page" drop-down menu, select your newly created "Blog" page.
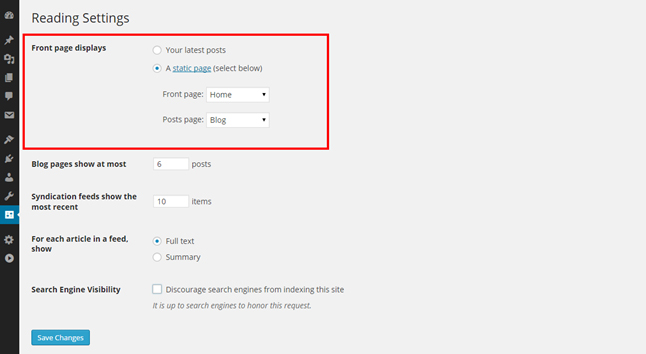
Be sure to save changes when you're finished.
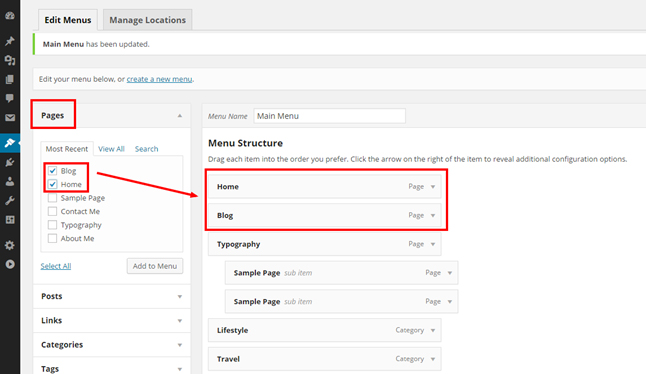
The last step involves adding your "Home" and "Blog" pages to your navigation menu. To do so, go to Appearance > Menus. Click the "Pages" drop-down menu on the left, check the boxes next to your "Home" and "Blog" pages, and add them to the menu. Drag and drop them to wherever you'd like them to be positioned in your menu. Be sure to save when finished.
Now, when you refresh your site, your homepage will display your newly created "Home" page and your "Blog" page will now display your post feed.
Creating a Main Menu
How to create a navigation menu:
- WordPress Dashboard > Appearance > Menus
- "Create a new menu" > Choose a menu name
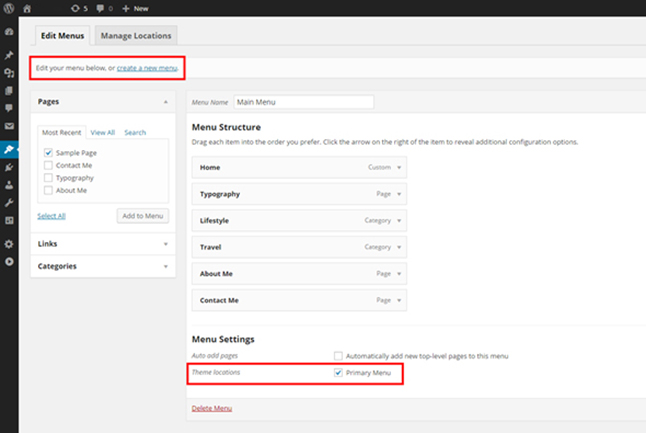
- Be sure to check the box toset the menu as "Primary menu"
- Save menu
Adding Pages, Categories, etc. to your menu
On the left side of this screen are a number of drop-down boxes titled "Pages", "Links" and "Categories". Each heading will list available items you can add to your menu.
For example, to add a Page to your menu, please ensure you've first created the desired page (within WP Dashboard > Pages > Add New). Click the "Pages" drop-down heading. The pages you've created will be listed below (see screenshot above). Check the box next to the page you'd like to add to your menu and click "Add to menu". The selected item should now appear under "Menu Structure" column. Here, you can drag and drop the item you've added to adjust its location in the menu. You can also create sub-menus by dragging and dropping a menu item underneath another so that it's indented.
TUTORIAL: Adding a "Home" link to your menu
To add a link to your navigation menu that will direct users back to your homepage, select the "Link" drop-down menu. Enter your homepage's URL into the appropriate box and then give it a title, such as "Home". Click "Add to Menu" and drag and drop the menu item to where you'd like it to be placed.
TUTORIAL: Adding a Category page to your menu
Once you've created a post category (within a post's create/edit screen) and assigned it to at least one post, when you look within Appearance > Menus > Categories, you will see this category listed. Check the box next to your desired category and select "Add to Menu". WordPress will automatically generate a page and pull in all posts that have this particular category assigned to it.

TUTORIAL: Creating an empty parent menu item
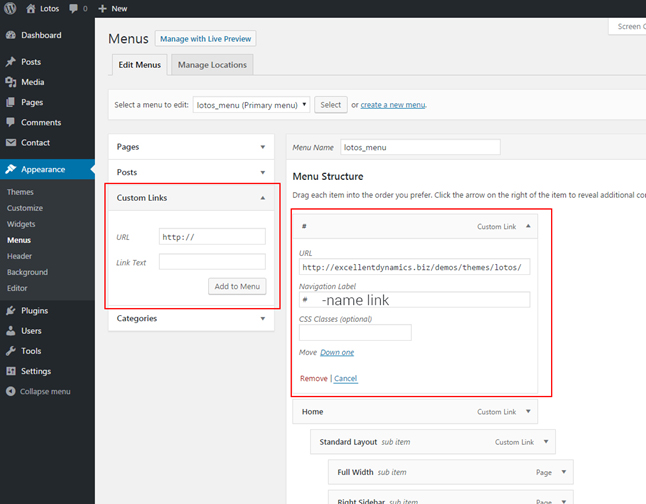
In some situations, it's preferable to have a "parent" menu item which, when clicked, leads nowhere. Nested beneath the item, there may be a variety of related "child" menu items. For example, a parent menu item titled "Categories" which is not hyperlinked, and child menu items of your various category options. To create a menu item that doesn't link anywhere, you can navigate to WP Dashboard > Appearance > Menus. Select the drop-down on the left titled "Custom Links". For its "URL" field, you can simply use a hashtag ( # ) character. For its "Link Text" field, you can enter whatever you'd like the menu item to be named. When finished, click "Add to Menu". Next, nest your other regular menu items beneath this un-hyperlinked parent item. Save changes when finished.
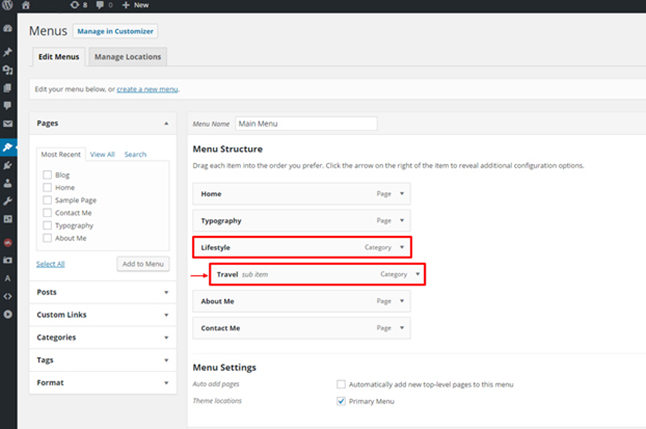
Sub Menus
Once you've populated your menu with items, you can create sub-menus by dragging and dropping the items "within" other menu items. When you drag one item beneath the "parent" menu item, it will indent a bit to the right. This indicates that the "child" menu item is now nested beneath the "parent" menu item.
Editing Menu Items
If you wish to edit or remove a menu item, click the little arrow on the right-side of the menu item name. A selection of options will drop down, including editing the navigation label as well as removing the item altogether.
Additional Menu Item Features
For additional menu features, click on the "Screen Options" tab in the top-right corner of the Menu page. Here, you can add the option of linking directly to a Post or specific Tag within your navigation menu. You can also check the box next to "Link Target" to give yourself the option of having menu items open in an entirely new tab when clicked.
For more information on menus in WordPress, check out:
http://codex.wordpress.org/WordPress_Menu_User_GuideAdding Social Icons
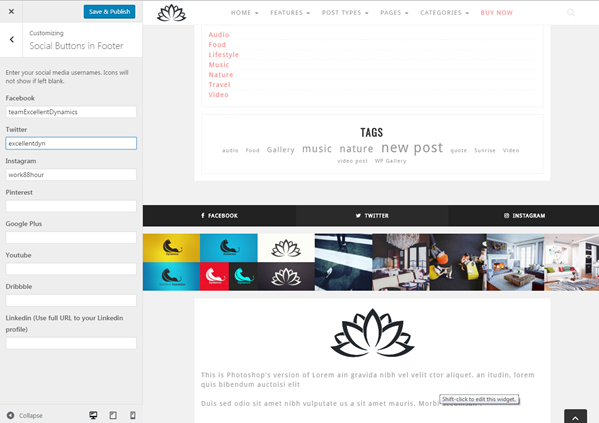
Navigate to Appearance > Customize > Social Button in Footer Here, you will see a list of social networks followed by a text input box. If you'd like to have a social icon for a particular social network, you can type in your username for that particular network.
Please note that you do not need to insert your profile's full URL into this box unless prompted to do so. Only your related username is required. The username you enter will be added into a pre-set URL for the network.
For example, if you enter the Instagram username "work88hour" within Social Button in Footer, your Instagram icon will automatically link to the URL: https://www.instagram.com/work88hour/
Once you enter your username into a particular social network's text box, its icon will appear in your top-bar & footer social icon areas. If you leave a social network's box blank, the social icon will not appear in the top-bar or footer areas.
To add the social icon widget to your sidebar or footer area, you can do so within WP Dashboard > Appearance > Widgets.
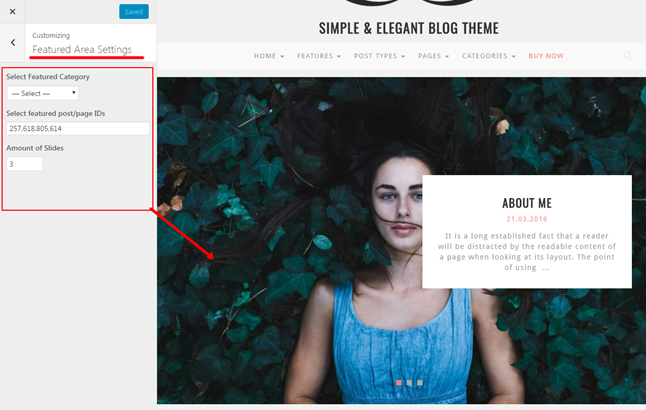
Enabling the Featured Area Slider
Setting Up the Slider:
Lotos's featured area slider is a large area toward the top of the homepage where you can feature eye-catching images linking to your posts. There are a few steps to ensure your slider works perfectly:
- Enable your slider: To enable it, you can navigate to WP Dashboard > Appearance > Customize > Featured Area Settings > and enable the slider here.
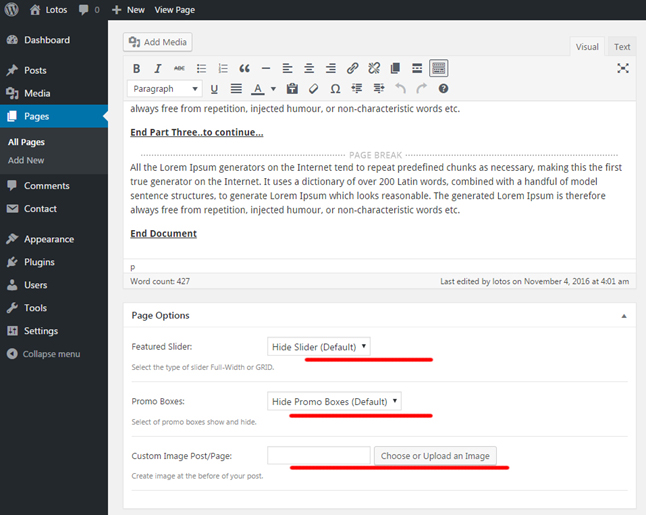
- Ensure your posts have featured images assigned: Lotos gives you two options for assigning an image to represent a post/page in the slider. One option is to simply assign a Featured Image to your post. By default, this is the image that the slider (and many other sections around the theme) will pull in to represent your post. Lotos also allows you to assign a specific image to represent the post in the slider separate from your post's Featured Image. To assign an slider image, navigate to your post's create/edit screen and look in the meta box titled "Page Options".
- Have your slide images display in their best quality: Ensure that the source images are at least 1900px in width & 530px in height. If your featured images are smaller than 1900x530 pixels, WP will upscale them to fit the slider's container size which may result in image graininess.
Choosing Your Slider's Posts:
Within Appearance > Customize > Featured Area Settings, you have 3 options for choosing which posts appear in your featured area slider:
- All latest posts: By default, the slider will display all of your latest published posts.
- Posts from specific category: From the drop-down menu titled "Select Featured Category", you can also choose a particular post category to display in your slider.
- Specific posts/pages: In the box beneath the title "Select featured post/page IDs", you can determine exact posts and/or pages to display in the slider.
Every time a post, page, or category is created, WordPress assigns it a unique ID number. Identifying an ID is quite simple. In this tutorial, we will be determining a post's ID, though the steps are the same for pages and categories as well.
Navigate to your WordPress Dashboard > Posts page. Here, all of the posts you've created should be listed beginning with the most recent.
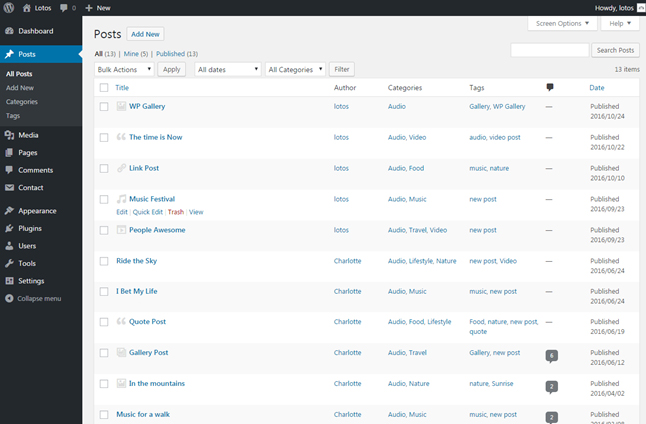
To find a specific post's ID number, hover your mouse over its post title. As you hover, you'll notice a little box appears in the bottom-left corner of your screen displaying the link's complete URL. Your post's ID number is hidden within this URL. For example, my post's URL looks like this:
http://.........../lotos/wp-admin/post.php?post=1022&action=editToward the end of the URL, you can see a bit of text that says "post=1022". This tells us the post ID number. This particular post has a unique ID number of "1022".
That's it! The same steps can be used to determine a page or category ID as well. Simply navigate to WP Dashboard > Pages and hover over a page's title URL to see its page ID. Or, navigate to WP Dashboard > Posts > Categories and hover over a category title to see its category ID.
Setting Up Your Promo Boxes
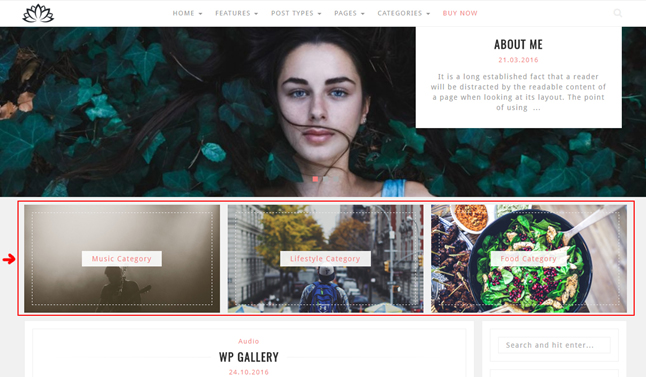
The 3 boxes below the featured area slider on Lotos's demo site are called Promo Boxes. These boxes allow you to draw special attention to any post, page, or general URL you'd like. To set up your promo boxes, navigate to Appearance > Customize > Promo Box. Here, you can enable/disable the promo boxes and input your various promo box preferences.
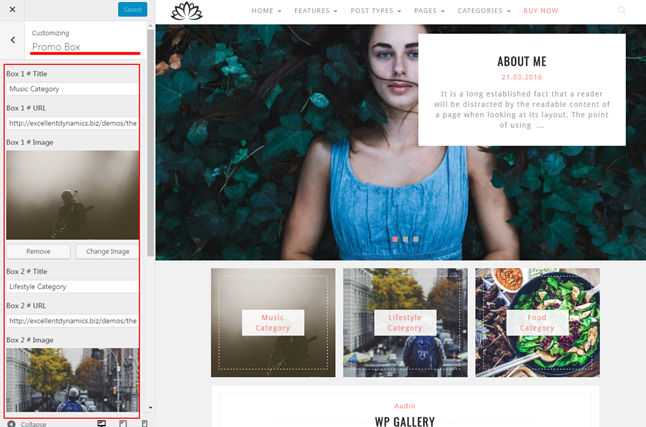
For each of the 3 promo boxes, you have the option to enter a title, select an image, and input the URL you'd like that specific promo box to link to.
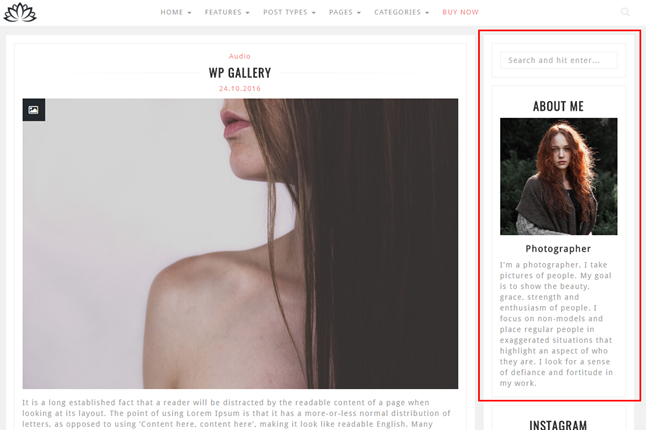
Setting Up Your Sidebar
A sidebar is a vertical content area that displays to the right of your main content/post area. You customize your sidebar by stacking up different widgets that display a variety of things.
Enabling/Disabling the Sidebar:
To enable/disable the sidebar on your homepage and/or your archive pages (category pages, tag pages, etc.) navigate to Appearance > Customize > General Settings. Here, you can check or uncheck the boxes next to "Disable Sidebar on Homepage" and "Disable Sidebar on Archives".
To enable or disable the sidebar on your Posts, you can do so from within the post's create/edit screen. This allows you to enable the sidebar on your singular post page on a post-by-post basis. To enable or disable the sidebar on your static Pages (pages created within WP Dashboard > Pages) you can do so within the page's create/edit screen using the "Templates" drop-down menu.
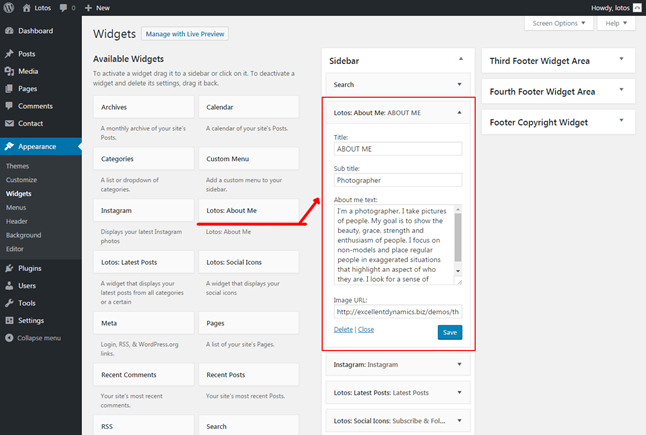
Adding Widgets to Your Sidebar:
To add, remove, or edit your sidebar widgets, navigate to Appearance > Widgets. On the left, you will see a list of the available widgets to choose from. On the right, you will see a few different widget areas in the theme. To add a widget to your sidebar, simply drag & drop a widget on the left into the widget area titled "Sidebar".
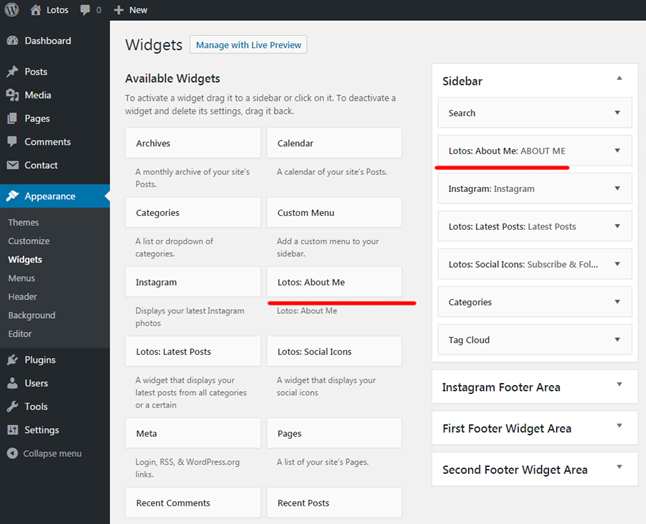
Edit Widgets in Your Sidebar:
Once you've dropped a widget into the Sidebar widget area, click on its heading. A drop-down will appear and you can make any necessary adjustments to the widget's settings. From this widget setting drop-down, you can also delete the widget. To position widgets within the sidebar, drag and drop them above or below each other.
Setting Up The Footer Area
The footer area is the lower portion of the theme that will appear on all pages of your site. It can include:
- 4 widget areas
- Social icon area
- Instagram footer area
- Copyright text area
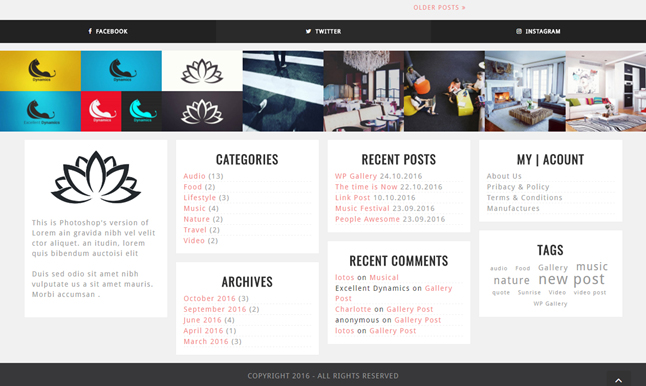
Widgetized Footer Area:
Similar to the section above regarding "Setting up your Sidebar", the footer has three side-by-side widget areas titled "First Footer Widget Area", "Second Footer Widget Area", "Third Footer Widget Area" and "Fourth Footer Widget Area" where you can add in widgets of your choosing. You can add multiple widgets in each of the four sections, however, for ideal display, we recommend inserting one widget per footer widget area.
Social Icon Area:
The footer's social icon area is directly connected with Lotos's top-bar social icon area. To choose which social icons you'd like to appear, enter your username for each social network platform within Appearance > Customize > Social Button in Footer.
Instagram Footer Area:
Similar to the section above regarding "Setting up your Sidebar", the footer has a widget area titled "Instagram Footer Area" where you can add in a widget to display your Instagram images in a full-width. The widget is simply called "Instagram" and is made available after installing & activating the plugin called WP Instagram Widget.
To add the Instagram widget, navigate to Appearance > Widgets. On the right, you'll see the theme's different widget areas. One of which is the widget area titled "Instagram Footer Area".
Drag the "Instagram" widget from the left of this screen into the "Instagram Footer" widget area. To edit the widget's settings, click on the widget's heading once it's been placed in a widget area. A drop-down area will appear. To have your Instagram footer display like the Lotos demo site's, set the "Number of photos" option to be "8".
Copyright Text Area:
At the very bottom of the theme is a bar which features a text area to include copyright or disclaimer text. You are not required to include a copyright or disclaimer statement. In fact, you can type whatever you'd like in this area!
For help troubleshooting issues in Lotos or to see some fun customization tutorials, check out all of Lotos's FAQ Articles here! Lotos Articles
Setting MailChimp for WP
Install the Plugin
To install the MailChimp Widget plugin, from the WordPress dashboard go to "Plugins" and click on "Add New." In the search box, type in "MailChimp" and submit the search. Click "Install" for the MailChimp for WordPress plugin and follow any necessary prompts on screen, then click "Return to Plugin Installer."
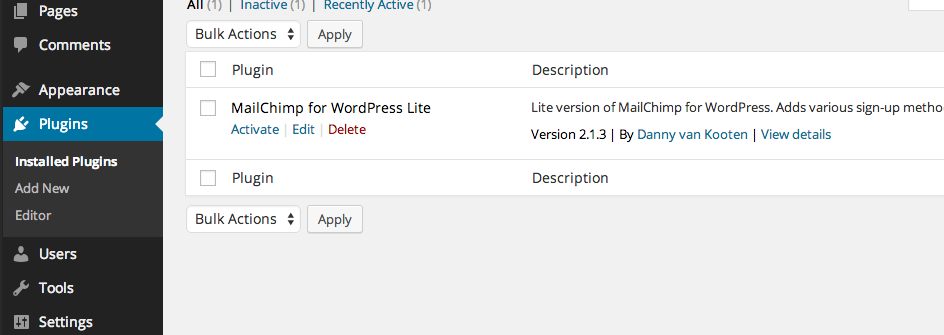
To check that the plugin is installed and activated, from the WordPress dashboard go to "Plugins" and click on "Installed Plugins."
Connecting to MailChimp
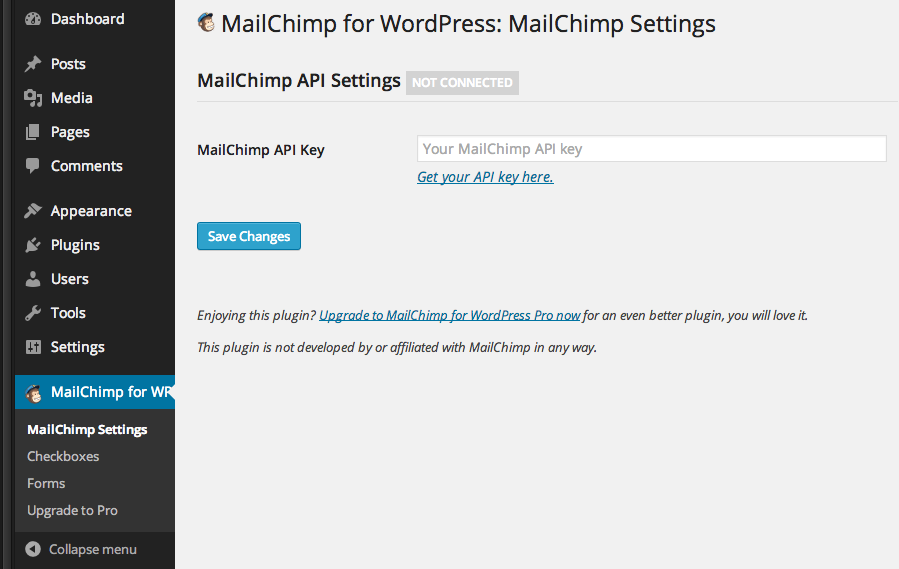
After ensuring the plugin was installed, select "activate" to begin using the new plugin. This will add a new entry titled, "MailChimp for WP," into the navigation menu on the sidebar. Click "MailChimp for WP" setup the plugin.
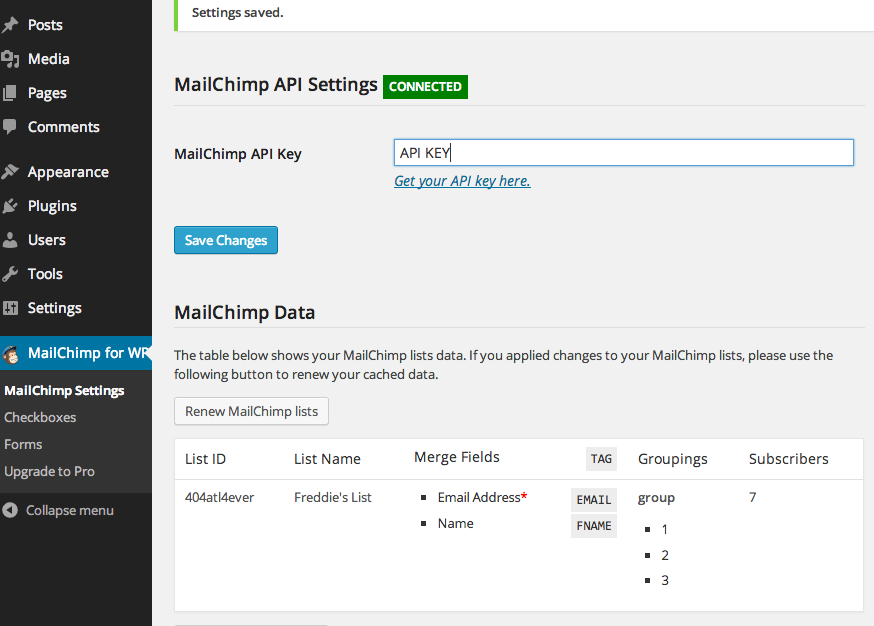
To connect your MailChimp account you will need to enter your API keys into the necessary field. The plugin provides a convenient link, below the field, which will direct you to the API key in your MailChimp account. You must be logged in to your MailChimp account for the link to work as expected.
Once the API key is added and the changes saved, your list information will populate in the "MailChimp Data" area. This will give you a break down of each list and the fields associated with them.
Configuring the Plugin
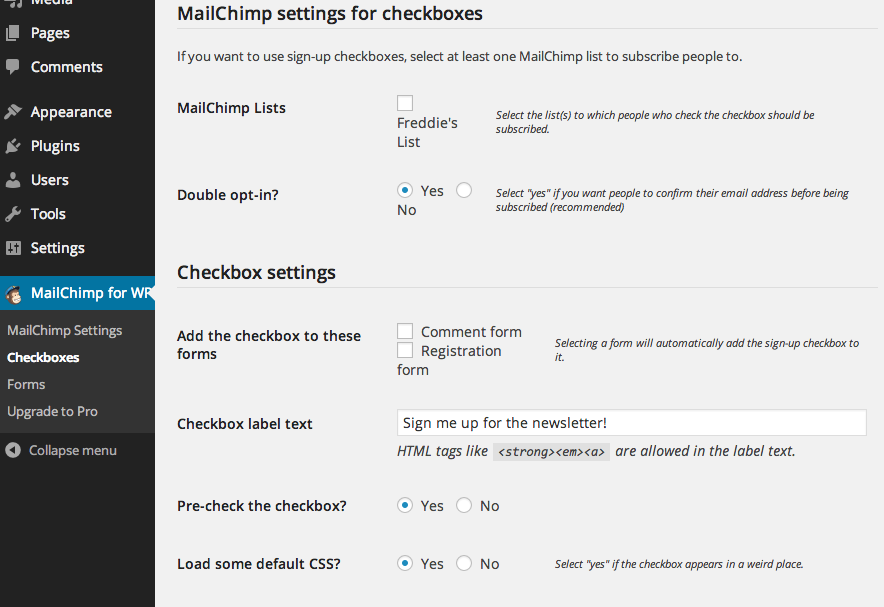
The plugin offers two different options for collecting subscribers. One option is to add a subscription checkbox to the comment and/or registration forms which would allow visitors to subscribe to your list during the commenting or registering prcess. The other option is to build a signup form to add to any or all of your website's pages.
Within the MailChimp for WP sidebar menu, choosing "Checkboxes" will allow you to configure the checkboxes used for signups. In this area, you can choose which lists subscribers are added to, double opt-in settings, and additional styling elements.
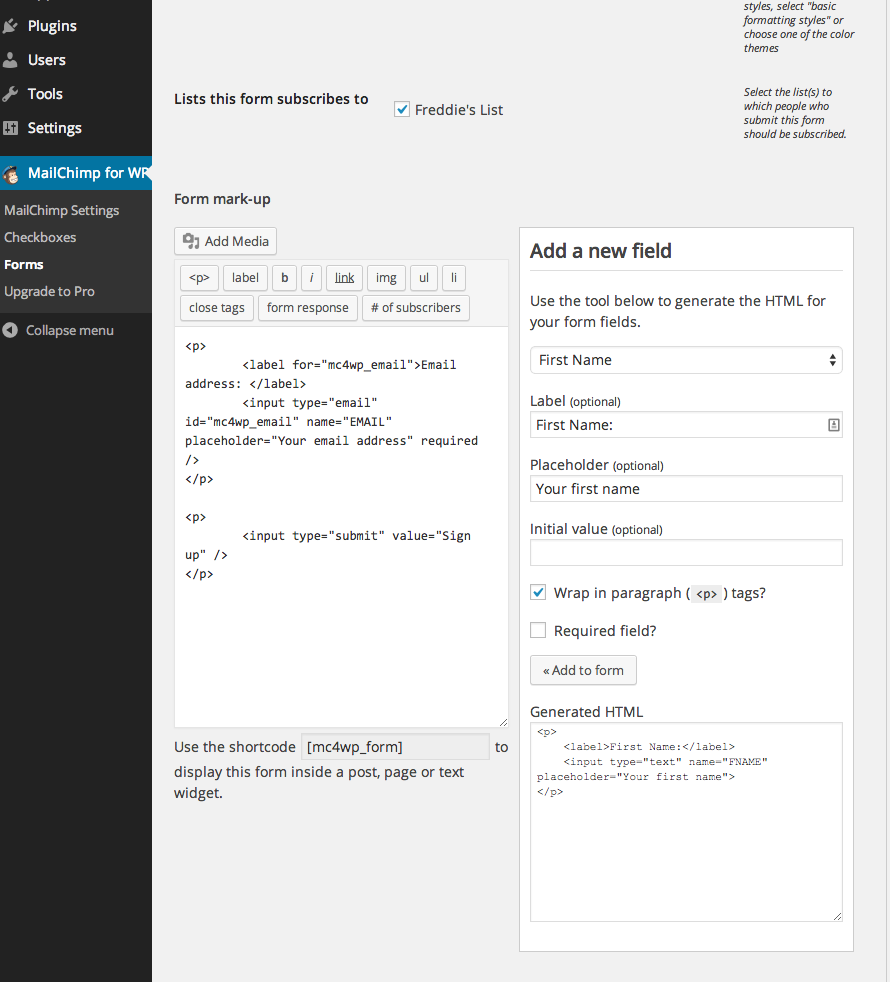
Under the "Forms" menu, you can create and customize the HTML for the signup form to place within your Wordpress site. By default, the form will be setup for an email field. To add additional fields to the form use the "Select MailChimp field" drop-down under the "Add a new field" area. Before adding the additional fields, you have the ability to edit the field's properties. For example, you can add in a default value for a form field and mark a field as required.
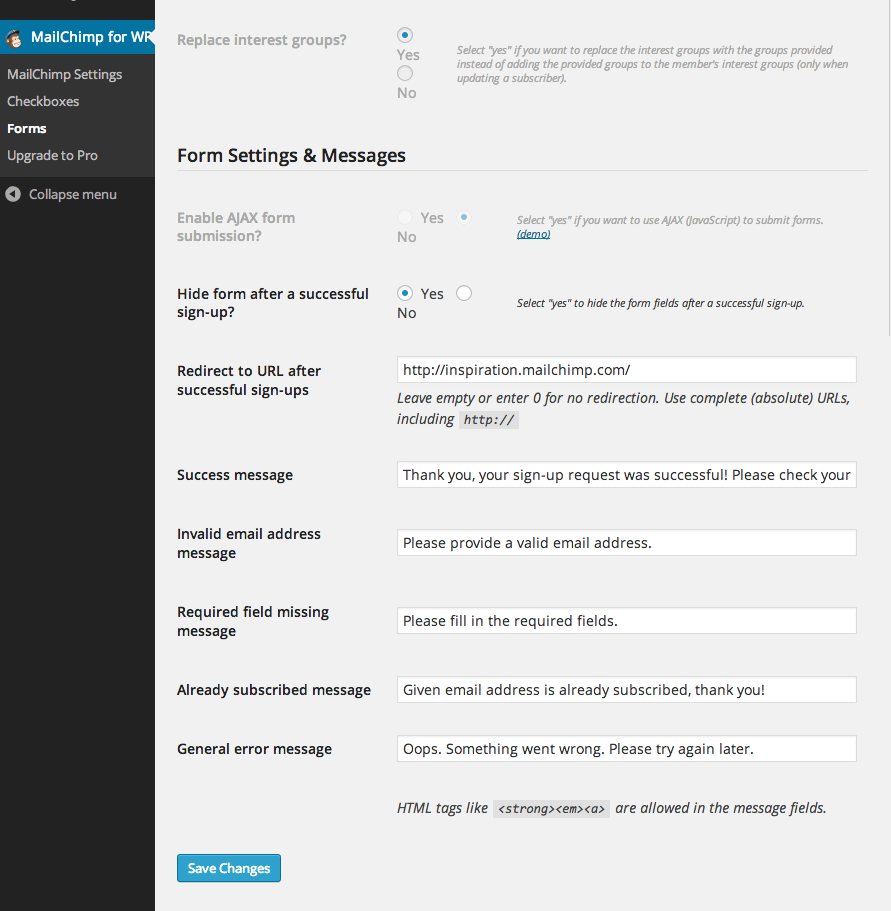
Under "MailChimp Settings," you can customize the signup options for the form, such as double opt-in, and the ability to send a welcome email. Finally, in the "Form Settings & Messages" area you can adjust messages shown when a form submission is complete as well as any error messaging.
Publish the Form
Once you've finished customizing your form, you can publish it to your Wordpress site. To add the form to one of your Wordpress pages, either copy the HTML generated under "Form mark-up" or copy the shortcode provided below the code. Click to edit the Wordpress page or menu you wish to use and paste in the code where desired.
Sources & Credits
You can see some help info, when click links which are below each regarding script:
- Icon Set – More 500 Icons Font Awesome
- HTML, CSS, and JS framework – Bootstrap
- JS Framework – jQuery
- Fluid Width Video – Fitids JS
- Touch Carousel – Owl Carousel
- Chosen JQuery Plugin – Chosen JQuery
- Google Fonts – Fonts
- Pictures for demo – Unsplash
If you have a more general question relating to the themes on ThemeForest, basic HTML/CSS/JavaScript related questions, you might consider visiting the forums and asking your question in the "Item Discussion" section.
Regards,
Team Excellent Dynamics