Introduction to Email Customizer
Item Name: Make - Email Customizer for WooCommerce
Item Version: v1.0.0
Author: ExcellentDynamics
Support Email: info@excellentdynamics.biz
License: GNU General Public License v2 or later
Beautifully Customized WooCommerce Emails
Email Customizer enables full customization of your WooCommerce emails. Customize colors, header & footer format, add custom links, link to your social networks, and customize what the email says - with shortcodes - all using the familiar WordPress Customizer interface. You no longer need to be a developer to do this. And if you still want to you can add your own custom css too.
Currently customization requires going into the code and editing the php template files, which isn't really an option for a non-programmer, and can be slow even if you are. We wanted to give you an environment that is simple to use, gives you a live preview of your customizations, and can send a test email when you are done. That's what Email Customizer for WooCommerce does.
The plugin also adds functionality to your WooCommerce Orders page so you are able to open a preview of any of the email templates (New Order, Invoice, Processing Order, etc), and send/resend that email to your customer or yourself.
Email Customizer for WooCommerce has made managing the email communications sent from our store much simpler and more beautiful - making our whole operation look and sounds as solid as it is. We think it can do the same for you.
- Customizing of the the styling, colors, header & footer format, add custom links, link to your social networks, and now even customize what the email says.
- Tailor what your customer reads and sees, before you send it - helping your operation to look and sound as solid as it is.
- Developers who can now also easily preview changes as they develop, modify or enhance their email template files.
- Shop Managers who want to preview & send/resend emails (New Order, Invoice, etc) right from the WooCommerce Order page.
First of all, Thank you for purchasing this plugin and for being my loyal customer. You are awesome!
You are entitled to get free lifetime updates to this product and exceptional support from us.
This documentation is to help you regarding each step of customization.
Support
Can’t find an answer or stuck on any of the docs? Email me and I’ll do my best to help.
Ask a question →
General Use of Email Customizer
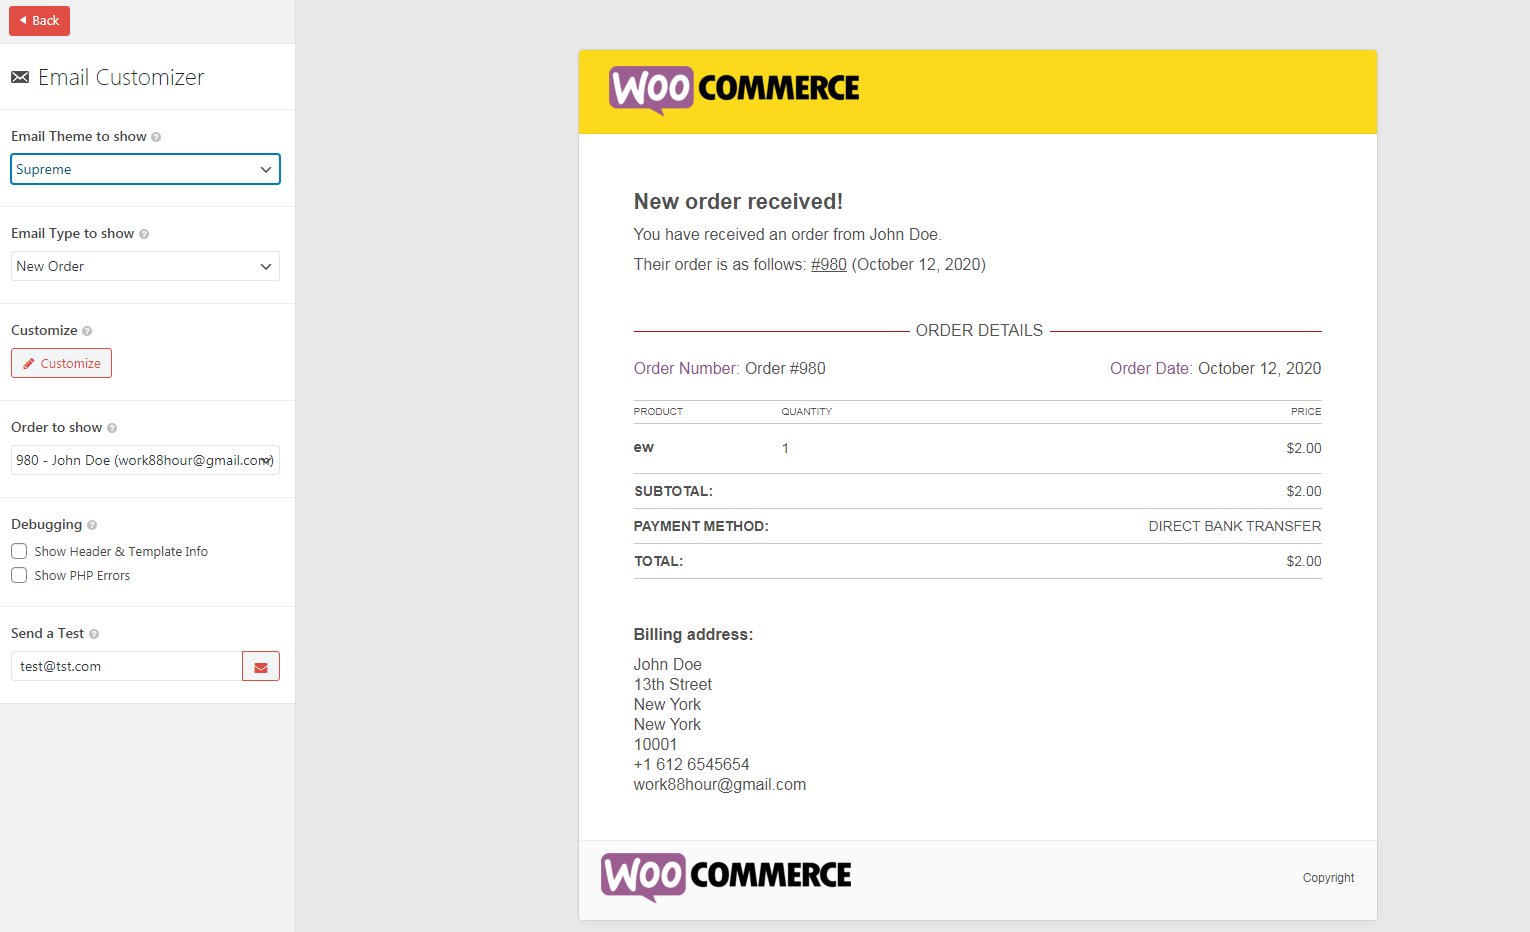
This layout is based on the built in WordPress Theme Customiser using the full-width to enable you to see and manage the Email efficiently.
Email to Show:
Choose which email template to see in the preview window to the right.
Order to Show:
Choose which order to show in the email template preview.
Template to Show:
You can choose the built-in WooCommerce or the Deluxe template. When a template allows customizing (like Deluxe) the Customize Template button will become active.
Customize Template:
Click customize to reveal the panel that will allow you to fully Customize the style and content of your emails. (see below for more on this panel)
Template to Show:
You can choose the built-in WooCommerce or the Deluxe template. The latter will reveal the Customize Template button
Show Header Info:
This will slide down to show a panel above the preview with the Meta info that is sent along with the email - Subject, From Email.
From Name, To Email.
We also added simple Edit links that will pop out the WC email settings tab for you to modify these settings.
Send a Test:
This field can take a comma separated list of email addresses, and will send the email that you see in the preview window to the email address(s) you specify. We pre-populate the field with Billing Email Address from the selected Order, so feel free to change this and Send a Test.
Installation & Plugin Locations of Email Customizer
Installing the plugin:
Make sure that WooCommerce is installed and working on your site. For instructions on installing the WooCommerce plugin see here.
Install the Email Customizer plugin into your WordPress installation by following the normal steps here.
Plugin Locations:
There are 3 places you will see our plugin:
- WooCommerce → Email Customizer
- WooCommerce → Settings → Emails (tab): Email Customizer
Adding a Full Width Image in Email Customizer
To add a full with image to take up the full width of your emailers you can navigate to the Email Customizer settings and under the "Header " section you can select to upload your full width logo.
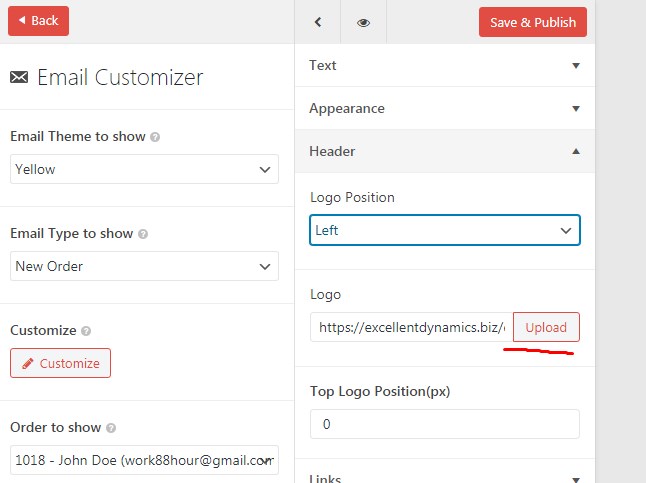
Select and upload your full width logo at the recommended size of 800px wide.
If you upload a larger image then the emailer will take on the width of the image.
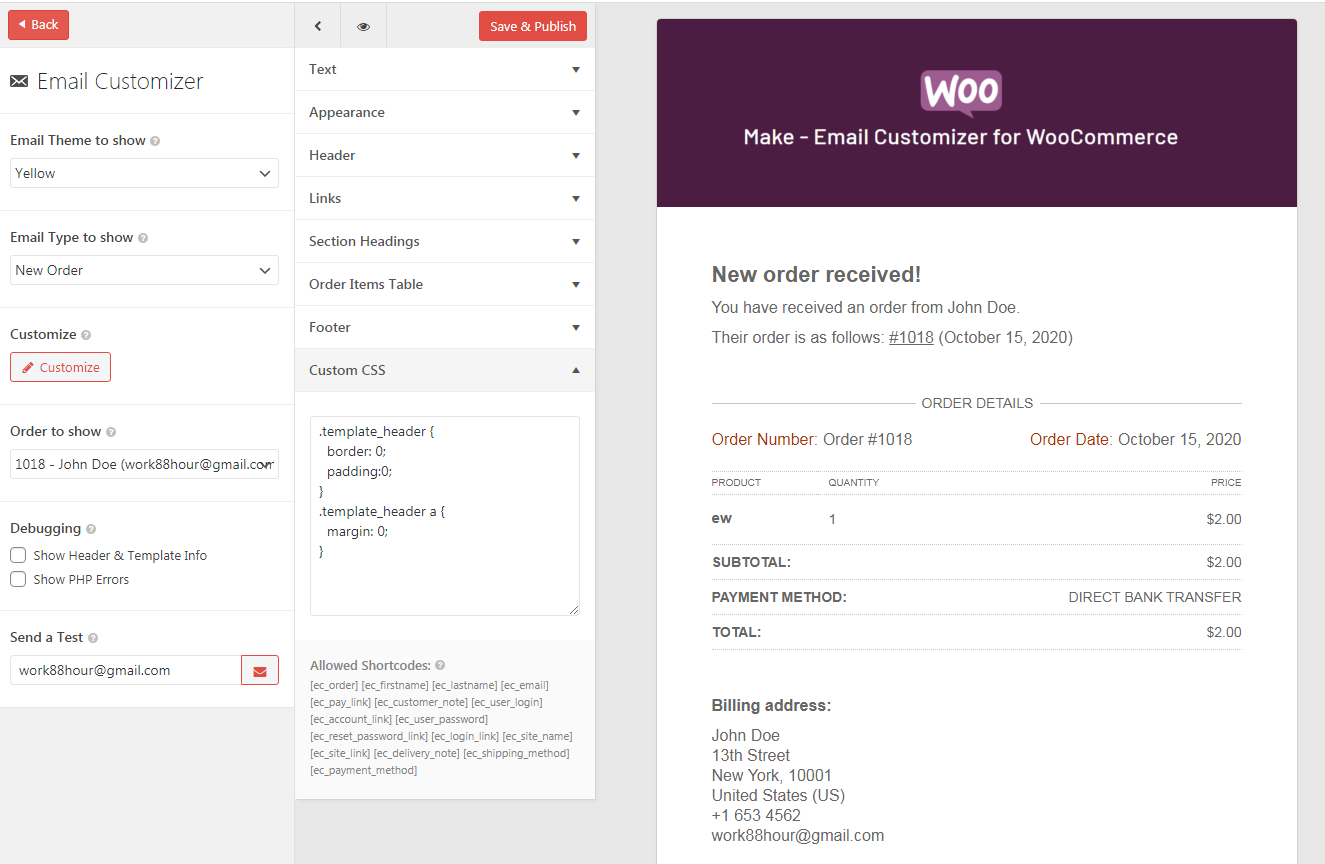
Then you can add the following custom CSS to the "Custom CSS " section to remove the border at the bottom and the left spacing which the logo usually has.
				.template_header {
				    border: 0;
				    padding:0;
				}

				.template_header a {
				    margin: 0;
				}
Your image should site nicely taking up the full width of the Email Customizer emailers.
Internationalization (translation) for Email Customizer
Internationalization of our Plugin to your language:
Go here to get general information about WordPress plugin internationalization.
To get our plugins to display in your own language creating these .po & .mo:
- make-en_US.mo
- make-en_US.po
Then you can put the files in either one of the following locations:
For Custom Text AreasThe way to translate custom fields: They will not appear automatically in WPML or any other translation plugin as they are created dynamically at runtime – you need to add the string manually in WPML (copy-and-paste them) and do the accompanying translation there. Then when the custom text is called, it will use your newly translated version.
Problem Strings in Loco TranslateFor Loco Translate, if you are having trouble translating strings such as Quantity, Product, Price, etc, you need to have a .pot file in /wp-content/languages in the translation language you need, example "control-email-fr_FR.pot". Copy the original en_EN.pot file and change the name manually. A .pot file is the template for the translation. After you have the template, Loco will be able to show you the regular translation screen with the original and the translation and once you save, you'll have a .po and .mo file (automatically saved to /wp-content/languages/loco/plugins. Then, if your wordpress installation is using the fr_FR language, it will pull these 2 files to translate the plugin.
Settings for Email Customizer

In the WooCommerce Settings we now give you the ability to preview each individual email, as well as being able to see an Order in the template, and send to any customer.
Shortcodes in Email Customizer
One of the main features of Email Customizer is that it enables the editing of the text in the WooCommerce transaction. In the text you will also want dynamic data unique to the current order e.g Order, Customer Firstname, Customer Lastname, etc. We do this using the built in WordPress shortcodes - ours look like this e.g.
[ec_order] [ec_firstname] [ec_lastname]How to use our shortcodes:
Below you'll find a list of all our shortcodes, but first let us explain the general characteristics of our shortcodes before explaining each one individually. Like all WordPress shortcodes, ours accept specific args that control how they are displayed when they render in the emails. The two main args are show & hide. Both are, similarly, a comma separated list of elements that will display when rendering the respective shortcode. for example the Order shortcode [ec_order] defaults to showing all of the following #, number, date, link, container (all shortcodes show the container <div> by default so that you can target it and style it using CSS).
You can then customize the shortcode by using the show arg to show only the # and the Order Number like this [ec_order show="#,number"] which will display like this "#3456".
Alternatively you can use the hide arg like this [ec_order hide="container,#"] to display all the order info except the container and the #.
Our Shortcodes:
[ec_order]
This shortcode displays the main information about the order: Order Number, Date, etc (also explained in the intro above) e.g #1431 (September 20, 2016)
args:show - (optional) Comma separated list of the elements to show (default: number, #, date, link, container)
options:
- number - the order number e.g. 1431
- # - should the order number be preceded by the '# ' symbol
- date - the date portion of the order display e.g. (September 20, 2016)
- link - should the order text have a link to the order <a href="...">...</a >. This will link to the My Account if it's a custmer email, or to the Order Edit page if it's an admin email.
- container - a span for you to target via your css looks like <span class="ec_shortcode ec_order">...</span>
hide- (optional) same options as show
[ec_order]
[ec_order show="#,number"]
[ec_order show="#, number, date, link, container"]
[ec_order hide="container"]
[ec_firstname]
The customers firstname.
args:show - (optional) Comma separated list of the elements to show (default: container)
- container - a span for you to target via your css looks like <span class="ec_shortcode ec_firstname">...</span>
hide - (optional) same options as show
[ec_firstname]
[ec_lastname]
The customers lastname.
args:show - (optional) Comma separated list of the elements to show (default: container)
- container - a span for you to target via your css looks like <span class="ec_shortcode ec_lastname">...</span>
hide - (optional) same options as show
[ec_lastname]
[ec_email]
The customers email address.
args:show - (optional) Comma separated list of the elements to show (default: container)
- container - a span for you to target via your css looks like <span class="ec_shortcode ec_email">...</span>
hide - (optional) same options as show
[ec_email]
[ec_pay_link]
If an order is awaiting payment (there is still money that needs to be paid) then the customer will need to visit the pay-for-order page. This shortcode outputs a link to that page, with the words 'Pay now' (or your translated language).
args:show - (optional) Comma separated list of the elements to show (default: container)text - (optional) customize the default text that outputs with this shortcode (default: Pay now)
- container - a span for you to target via your css looks like <span class="ec_shortcode ec_pay_link">...</span>
hide - (optional) same options as show
[ec_pay_link]
[ec_customer_note]
This shortcode can only be used with the 'Customer Note' email that gets sent when an shop admin uses the 'Add note' feature on the Order Edit page and he chooses 'Note to customer'. As the email is sent then the Note will be inserted into the email, on the fly.
It's worth noting that this is not the Delivery Note that the customer can optionally fill in with their order delivery address e.g. "The blue house at the end of the street". If this is what you're looking for then please [ec_delivery_note] next.
show - (optional) Comma separated list of the elements to show (default: container)
- container - a span for you to target via your css looks like <span class="ec_shortcode ec_customer_note">...</span>
hide - (optional) same options as show
[ec_customer_note]
[ec_delivery_note]
This is the Delivery Note that the customer can optionally fill in with their order delivery address e.g. "The blue house at the end of the street".
args:show - (optional) Comma separated list of the elements to show (default: container)
- container - a span for you to target via your css looks like <span class="ec_shortcode ec_delivery_note">...</span>
hide - (optional) same options as show
[ec_delivery_note]
[ec_user_login]
The customers Username. This shortcode is for use in the New Account email that's sent to the new customer if/when he signs up to your store.
args:show - (optional) Comma separated list of the elements to show (default: container)options:
- container - a span for you to target via your css looks like <span class="ec_shortcode ec_user_login">...</span>
hide - (optional) same options as show
[ec_user_login]
[ec_account_link]
A link to the customers My Account page.
args:show - (optional) Comma separated list of the elements to show (default: container)options:
- container - a span for you to target via your css looks like <span class="ec_shortcode ec_account_link">...</span>
hide - (optional) same options as show
[ec_account_link]
[ec_user_password]
This shortcode can only be used in the New Account email. It will output a new password for the customer if he/she requests it.
args:show - (optional) Comma separated list of the elements to show (default: container)options:
- container - a span for you to target via your css looks like <span class="ec_shortcode ec_user_password">...</span>
hide - (optional) same options as show
[ec_user_password]
[ec_reset_password_link]
This shortcode can only be used in the Reset Password email. It will output the words "Click here to reset your password" (or your translated language) that will link to the password-reset page for that customer.
args:show - (optional) Comma separated list of the elements to show (default: container)options:
- container - a span for you to target via your css looks like <span class="ec_shortcode ec_reset_password_link">...</span>
hide - (optional) same options as show
[ec_reset_password_link]
[ec_login_link]
This is for use with the New Account email. The customer will most likely not be logged-in so they will see the login screen where they can login with their username & password.
args:show - (optional) Comma separated list of the elements to show (default: container)options:
- container - a span for you to target via your css looks like <span class="ec_shortcode ec_login_link">...</span>
hide - (optional) same options as show
[ec_login_link]
[ec_site_name]
This will render the name of your WooCommerce store e.g. Superstore
args:show - (optional) Comma separated list of the elements to show (default: container)options:
- container - a span for you to target via your css looks like <span class="ec_shortcode ec_site_name">...</span>
hide - (optional) same options as show
[ec_site_name]
[ec_site_link]
Just like the [ec_site_name] shortcode above, but this one will adds a link back to your WooCommerce store e.g. Superstore
args:show - (optional) Comma separated list of the elements to show (default: container)options:
- container - a span for you to target via your css looks like <span class="ec_shortcode ec_site_link">...</span>
hide - (optional) same options as show
[ec_site_link]
[ec_billing_method]
Show the billing method that was chosen for the related order.
args:show - (optional) Comma separated list of the elements to show (default: container)options:
- container - a span for you to target via your css looks like <span class="ec_shortcode ec_billing_method">...</span>
hide - (optional) same options as show
[ec_billing_method]
[ec_shipping_method]
Show the shipping method that was chosen for the related order.
args:show - (optional) Comma separated list of the elements to show (default: container)options:
- container - a span for you to target via your css looks like <span class="ec_shortcode ec_shipping_method">...</span>
hide - (optional) same options as show
[ec_shipping_method]
[ec_custom_field] or [ec_get_post_meta]
The custom field shortcode allows you to output any custom field to your emails by specifying the 'key' of any custom field stored with the order. For example you can output the Company Name like this [ec_custom_field key="_billing_company"].
Note that when the custom fields are saved to the Order by WooCommerce they usually have a preceeding "_" underscore (which intentionally hides them on the order-edit page in wp-admin). To help you you find the key names for all the Orders' hidden custom fields you can use this helpful plugin Show Hidden Post Meta.
args:key - the key of the custom field you'd like to output to your email.id - (optional) the id of the order, or post, that you'd like to get the custom field from. If empty we'll use the current order (if this is an order email).show - (optional) Comma separated list of the elements to show (default: container)options:
- container - a span for you to target via your css looks like <span class="ec_shortcode ec_custom_field ec_get_post_meta">...</span>
hide - (optional) same options as show
[ec_custom_field key="_billing_company"]
[ec_custom_field key="_billing_company" id="4556"]
Editting your emails in Email Customizer
 Text Fields (Heading, Main Text, Footer Text): The top fields are usually the text fields that pertain to the current email type that you are looking at eg New Order. Here you can edit this text and see what it will look like in the preview. You should also use the suggested [shortcodes] in the text as, in the case of the Reset Password email, these fields are used to feedback dynamic information to the client - eg a Reset Password link, or an Order Number or Order link. You'll see a list of Allowed Shortcodes below showing you all the possible Shortcodes you could use. Each field is equipped with a Reset to Default button that you can use to return the field to it's suggested default value, so don't be afraid to experiment with some fun new text.
Allowed shortcodes are:
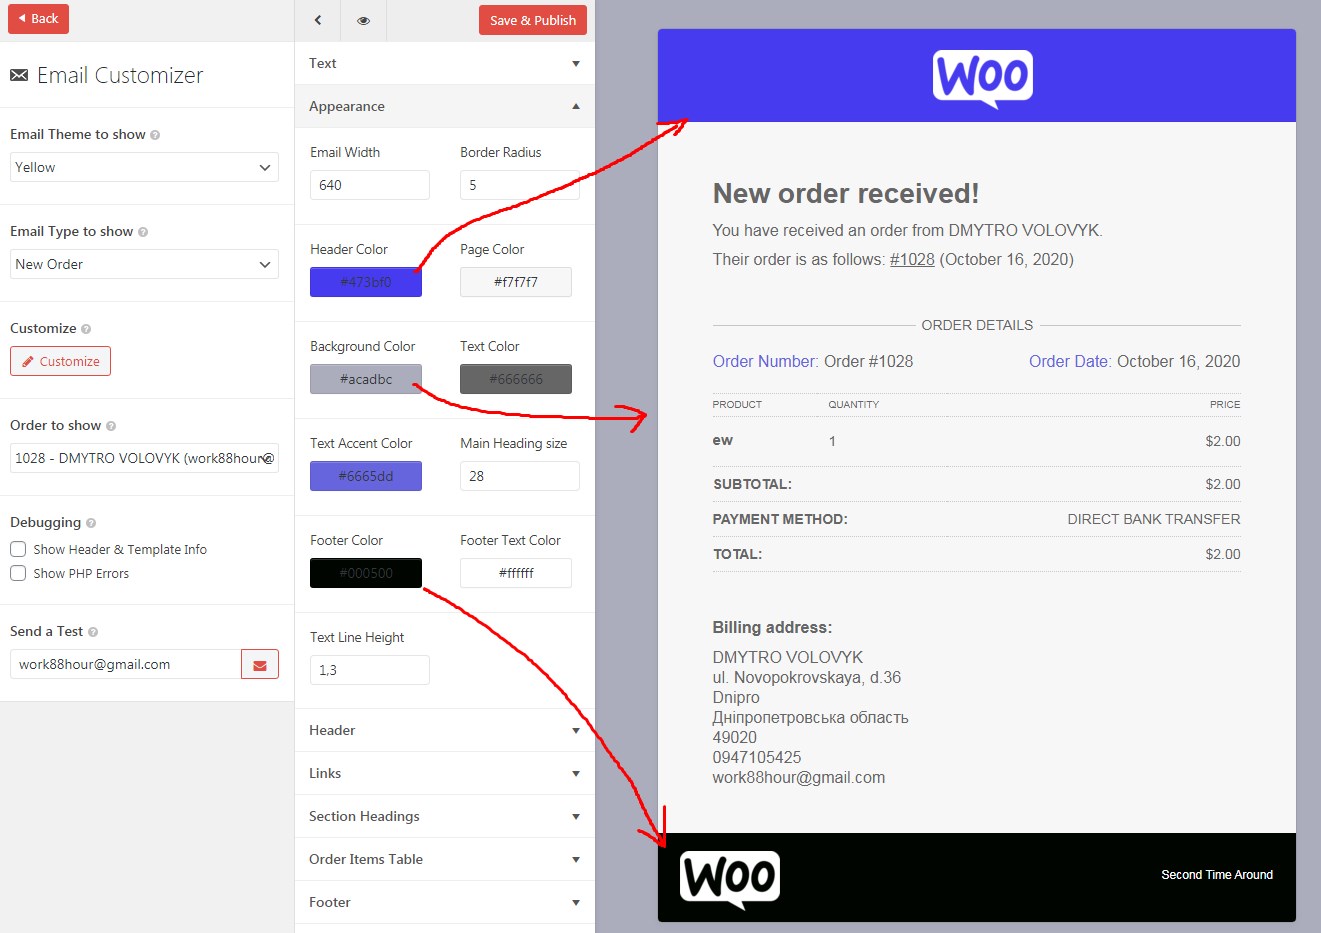
[ec_firstname] [ec_lastname] [ec_email] [ec_order] [ec_pay_link] [ec_customer_note] [ec_user_login] [ec_account_link] [ec_user_password] [ec_reset_password_link] [ec_login_link] [ec_site_link] [ec_site_name]Styling Fields (Page Color, Border Radius, etc):
Theres a lot of potential here to style the email as you'd like to more align it with your store or brand. Again seeing the preview in real-time.
Logo:
Upload your logo or any image that will appear in the email. This field defaults back the logo set in the WooCommerce→ Email Settings.
Top Buttons (x, eye):The Eye when hovered over does a quick reveal of the email so you can see the results of your changes without having to close your edits. The X will ask you if you are sure you'd like to close the panel without yet Saving & Publishing.
Save & Publish:This is the final click that you will use when you are happy with your customizations and are ready to Save & Publish the changes. From this point on your WooCommerce store will use the newly Customized emails when sending to your Customers.
* We always advise sending a few test emails to yourself or a test customer to make sure everything is working as expected.
* Please also note that Emails that have been created by third party plugins, that have not been explicitly catered for in our template set, will just not allow the editing of the text in the email. The colors, styling, logo and footer will all be fine, it is just that you will not be able to edit the text.
Support Rule
Please remember you have purchased a very affordable item and you have not paid for a full-time web design agency. Occasionally we will help with small tweaks, but these requests will be put on a lower priority due to their nature. Support is also 100% optional and we provide it for your connivence, so please be patient, polite and respectful.
If something is not working right, please send us a message or ask a question at info@excellentdynamics.biz.
Support for my items includes:- Responding to questions or problems regarding the item and its features
- * Fixing bugs and reported issues
- * Providing updates to ensure compatibility with new software versions
- * Customization and installation services
- * Support for Not Popular third party software and plug-ins
Before seeking support, please...
- * Make sure your question is a valid Plugin Issue and not a customization request.
- * Make sure you have read through the documentation and any related video guides before asking support on how to accomplish a task.
- * Try disabling any active plugins to make sure there isn't a conflict with a plugin. And if there is this way you can let us know.
- * Almost 80% of the time we find that the solution to people's issues can be solved with a simple "Google Search". You might want to try that before seeking support. You might be able to fix the issue yourself much quicker than we can respond to your request.